Knutsen Landscaping is pleased to announce the release of a new video that describes and details our work and services. Hear an interview with our founder and president, Andy Knutsen, and see beautiful footage of some of our latest work: beautiful pool decks, stunning firepits and fireplaces, and outdoor living spaces that dreams are made of!
Blog
Scroll
Blog
Overwhelming Options

Have you ever looked in virtual horror at the endless choices in your grocer’s cereal aisle? Or how about your pharmacy’s selection of cold medication? Healthy or sweet cereal? Oats or almonds? Fast-acting relief or long lasting? Decongestant or antihistamine? The vast array of possibilities in either case is enough to make one’s head spin!
These days, facing the almost endless options for landscaping materials and plants is very much like making those decisions at the grocery or pharmacy. Shrubs or flowers? Annuals or perennials? Deck or patio? Wood or stone? Fortunately, Knutsen Landscaping is here to save you from this dilemma! By speaking with our design team, you can determine what you want in your outdoor design and where to begin. What is the overall feeling you wish to achieve? What is the property like now? And how much do you want to change it? Are you looking to add a patio, deck, or other architecture? Or do you just want to redo the plants and softscaping?

These and many other questions are ones that you will have to consider, and the Knutsen team can guide you through them all. One of the biggest benefits of working with our design team is that we can together create a sense of consistency in your outdoor design, rather than the chaos that the inexperienced landscape “newbie” often ends up with. Your outdoor living space should have a unified, harmonious feel that fits well with your home, the contours of the property, the neighboring homes, and–most of all–you. We’ll start with an initial meeting, held at your home. There we’ll get an idea of the inspiration of your initial thoughts and discuss budget and material options. We will even start sketching out a rough draft of the project! Next, our landscape designer will set to work creating a specific design for your project. And we strive to keep the process open and interactive with photos and links to similar projects so you can see what we’re planning. Finally, once the proposal is approved and signed, we’ll order the materials and begin the installation.
Don’t go crazy trying to take in all these options and make sense of them! Contact Knutsen Landscaping for professional help in determining the best choices for your outdoor living space.
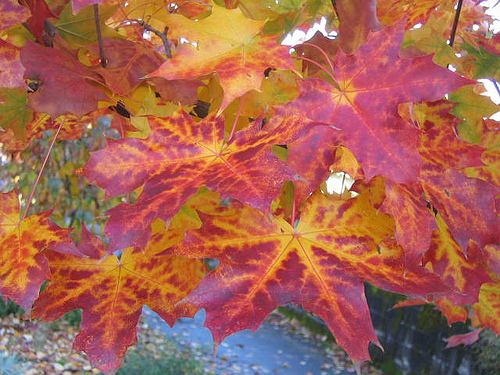
Fall Flowers and Colors
For many people, spring and summer are the banner months for landscaping. After all, who can deny the bright, beautiful explosion of colors available in the warmer seasons? Of course, the calendar turns, however, and fall is inevitable. But don’t despair! The array of autumn colors goes well beyond brown.
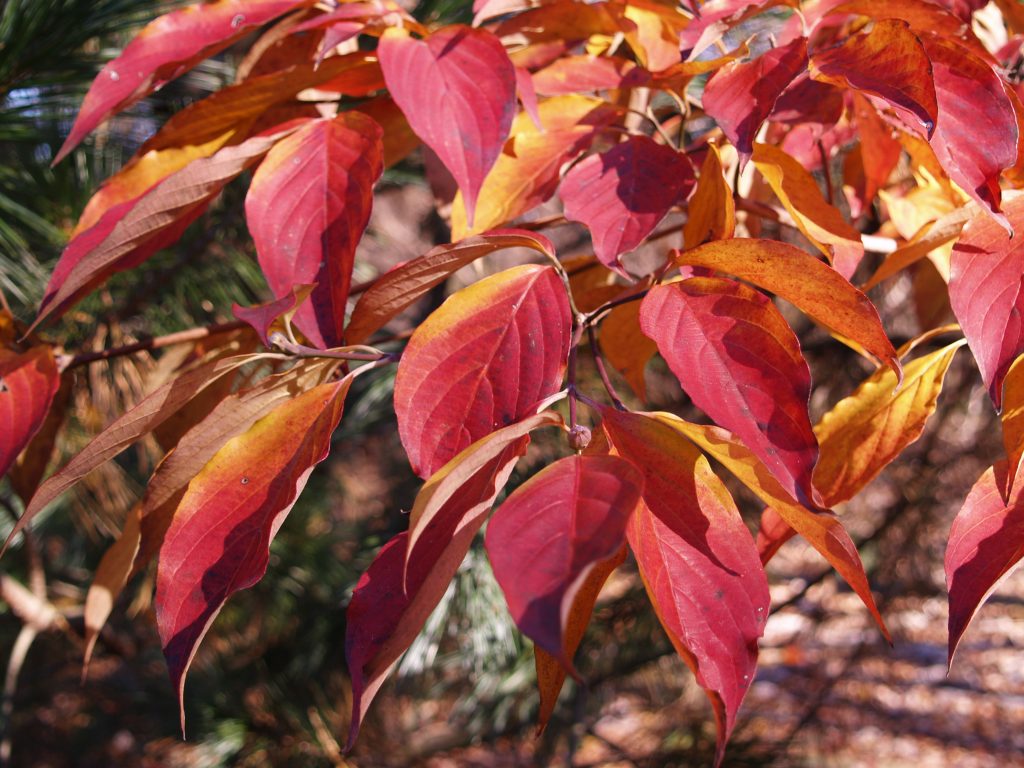
Add color to your property by planting the right tree. Fall is a great time to plant trees, and there are many ways to “decorate” your property naturally through tree plantings! There are many tree varieties with beautiful fall foilage to choose from, such as the Pacific Sunset Maple or a Stellar Pink Dogwood.
For flower bed options, here are some of our favorite fall beauties:
- Chrysanthemums are perhaps the go-to flowers for fall, and with good reason. Shades of red, yellow, orange, peach, and white provide a good beginning for your autumn palette. And don’t forget the pink–and especially purple–contrasts to round out your mums. Most of us are familiar with the seasonal varieties sold at florists and garden centers in the fall, but if you find plants labeled as “garden mums,” they can last for years.
- Versatile and heavy blooming pansies are available in just about every color in the rainbow, so can provide any splash of color you need for your autumn palette. What’s more, if planted in the fall and covered carefully in the winter, pansies have a chance to come back in the spring.
- Celosia is a natural for fall because of the traditional fall colors available: bright yellow, warm orange, scarlet red, and deep burgundy purple. Additionally, the plumes of their blooms add vertical texture to other fall flowers.
- Fall-blooming varieties of dianthus, especially in the darker purple hues, will offer beautiful mum-like blooms to your fall garden. And be sure to plant them where you can enjoy their great scent!
-
Pacific Sunset Sweet alyssum also gives you a great scent, while also a carpet of color to enhance your autumn landscape. It can also be used in container gardens to cascade over the edge.
- The bold, dramatic Black-eyed Susan offers golden daisy-like flowers to brighten any landscape or container garden. And if left to form seeds, the Black-eyed Susan will attract finches and other birds as well.
- Please don’t overlook the ornamental pepper to add a pop of texture to your fall landscape. The colorful fruits of these plants come in festive shades of red, yellow, orange, and purple. And they’re available in different shapes and sizes, from the round Black Pearl to the elongated Chilly Chili.
As fall settles in, you have a wide array of colors and plants with which to paint your autumn landscape. So grab a pumpkin spiced latte and contact Knutsen Landscaping today to further explore the possibilities.
Smokeless Firepits in Time for Fall

However, one thing can quickly put a damper on everyone’s good time—smoke! In a turn on the old saying, where there’s fire there’s smoke. Thankfully, there are ways to minimize that problem. One excellent product that Knutsen uses is the Zentro Fire Pit Insert by Breeo. The Zentro is designed to fit into most standard fire pit structures; it’s available in 24-, 28-, and 32-inch sizes, both circular and square. Steel and stainless steel options are available in all sizes. (In addition to the inserts, they also offer standalone firepit models.)
You may be thinking, “Smokeless fire? How is that possible?” Good question! And honestly, no fire can be 100 percent smoke-free; but there is a way to greatly minimize that smoke to the point where it’s barely noticeable. The key to creating a smoke-less fire is a double-wall design. Small holes in the bottom of the inner chamber coax hot air between the walls. This hot air rises between the walls, heating more as it does, until another series of holes at the top carry it back into the fire. This hotter air creates a secondary combustion, burning the smoke created from the fire until it’s almost undetectable.

The great news is that all of this will fit right into your new or existing fire pit design; the Zentro is made specifically for that purpose. Furthermore, Breeo is a local company, formed and functioning in Kinzers, PA.
So when it’s time to consider creating or upgrading a fire pit for your outdoor living space, Knutsen Landscaping is your source. And with Zentro Fire Pit Inserts, we won’t blow smoke in your face!
Landscape Lighting
You’ve invested considerable time and resources to making your home and outdoor living space look just the way you want it. But what happens when the sun goes down? You certainly don’t want to lose all that beauty and curb appeal! Proper lighting will not only carry your design beyond the daylight hours, but it will allow you to create a new and exciting nighttime landscape.
Be sure to take the right approach in designing the lighting for your landscape. It may seem, for instance, that a trade electrician is the best place to start. But this decision may not afford you all the expertise you need for your outdoor lighting project! Trade electricians can certainly get the job done, but landscape lighting is not usually their wheelhouse. For the best results, a landscape designer is a much better choice.

- Although a trade electrician can certainly install your lighting, a designer brings a trained, professional, artistic eye to your design. Coming to a landscape designing like the professionals at Knusten is like asking a fine artist to paint your mural—rather than a house painter. You’ll get a much more aesthetically pleasing result. You and the designer can determine just what effect you want to achieve with your lighting, whether it’s a romantic, dramatic, mysterious, or other type of atmosphere you wish to create.
- Lighting designers like the team at Knutsen is knowledgeable about the growth of trees, shrubs, and other softscaping elements on your property. Such expertise can ensure that the design you create will evolve with the desired effect as years go by and your foliage changes. You don’t want to be disappointed when your landscape grows over the years! A landscaper will take these natural changes into account in the design.
- Landscape lighting typically relies on stepped-down power from your house, reducing 120-volt household current to a safer 12 volts. Because of this you do not need to trench the wire at 18” deep like you would with 120 volt. The wire just sits below your mulch or decorative stone in your beds. Running all the wire through the beds and out of beds is a landscaper’s specialty. They will have a much better understanding of how the system functions in and through your beautifully landscaped beds and how to restore to perfection after the job is complete!
It is definitely in your best interest as a homeowner to select a trained landscape professional to bring the right light design to your landscaping. Contact Knutsen Landscaping to speak with a lighting designer, and discuss the possibilities for showcasing your front yard and lighting up your entire outdoor living space.
Pools: Where to Begin for the Best Result
One of the most dramatic – and let’s face it, most expensive – elements of outdoor entertainment design is an inground pool. Some homeowners would start the process by calling several pool companies and getting estimates for installation on their property. Then after the whole process is finished and the workers from the pool company have cleaned up and left, the homeowner might decide the pool needs some landscaping.

First and foremost, a landscape designer will create an integrated overall design for your outdoor living space. We will consider the entire property and its relation to your home and neighborhood, as well as your own individual tastes and personality. Although a pool company will offer a range of selections, they are often rather standard. There’s nothing wrong with that per se, but landscape design is just not what they do.
A second major concern for designing your pool landscape is what kind of trees you want and where they will be placed in relation to the pool. You want natural shade and beauty, but you will also want to avoid dirt, pests, and fallen leaves. Considering all these options as early in the process as possible will help to give you the desired result.
A third consideration is the hardscaping that your pool area might feature. Walkways, fencing, decks or patios, and structures like a pergola or gazebo, work much better as integral parts of the design, rather than an afterthought. If these options are considered and discussed from the beginning, you’ll end up with a more harmonized overall look. Furthermore, you and your landscape designer can place the pool in the best location for all of these to work together.

An inground pool is probably the biggest investment homeowners will make in the landscape of their property. Again, a pool company can give you some options and install a perfectly serviceable pool. But if you start with a landscape designer, you can come up with a design that perfectly fits what you want on your property, and you’ll end up with an outdoor living space that is unique and unlike any other property in your area. And remember, a well-designed landscape – including a pool – can add as much as 15 percent to the value of your property.
So if you are ready to make the commitment to an inground pool on your property, make Knutsen Landscaping your first call. We will meet with you to determine your goals and options. Together we can make your unique outdoor living space one that you will enjoy for years to come.
You Bag It. Yard Jockey Hauls It.
Your lawn and garden are a reflection of you. Your care and effort make the grass greener, the flowers brighter, and the trees healthier. But when it comes to all debris you generate from mowing, pruning, weeding, and trimming, you may not have an effective way to recycle the yard waste back into the earth for a sustainable cycle of renewal. Yard Jockey’s bags are your solution for outdoor projects, large or small. Purchase a reusable bag today!
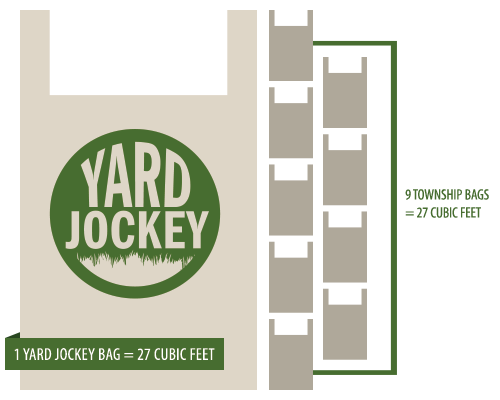
HOW IT WORKS
Our durable, reusable yard debris bags hold a full cubic yard of waste like grass clippings, branches, bush trimmings, mulch, edgings, and leaves! They offer a convenient way to keep your yard looking nice during and after weeding, pruning, or mowing. Avoid those messy piles that take up space in your driveway or block use of your lawn. Purchase a reusable bag today to recycle the yard waste back into the earth for a sustainable cycle. Simply call for a pick-up when your bag is full!
- Buy a Yard Jockey bag for $20.
- When your bag is full, go online to yardjockey.com and click the “haul it away” tab at the top to pay and schedule your pick up — just $30 a bag!
- Your Yard Jockey bag will be returned so you can move on to another lawn project.
Order a bag online* or call us at 717-786-9000.
WHAT IS YARD WASTE?
Yard debris includes brush/trimmings, tree limbs, grass clippings, stumps, leaves, soil, sod and rocks/stones.
Upgrading your Outdoor Living Space

The National Association of REALTORS® recently published a nationwide study examining the reasons home owners complete outdoor remodeling projects, the value of those projects, and the increased happiness on their completion. Ten different projects – the top ten according to the REALTOR® rank of projects’ appeal to buyers – were evaluated, and the results offer a range of appealing and profitable upgrades.
Of course, upgrading your outdoor living space does not benefit you only when it’s time to sell. The REALTORS® poll also tracked consumers’ viewpoints after completing projects. After installing a new deck, 77 percent said that they had a greater desire to stay home, 51 percent felt an increased sense of enjoyment, and 77 percent had a sense of accomplishment on completion. Even higher results came from a new patio: 82 percent expressed a greater desire to be home, 74 percent report more enjoyment, and 85 percent felt a major sense of accomplishment. The highest happiness rating came through adding a new pool: 95 percent claimed a greater desire to be home since installing one, 80 percent have an increased sense of enjoyment while at home, and 90 percent felt a major sense of accomplishment after completing the project.
So whether you are looking to sell your home or simply get more enjoyment from your property, investing in your landscaping and hardscaping can pay big dividends. Contact Knutsen Landscaping to discuss your goals and options. Together we can put together a plan to make the most of your outdoor living space.
Outdoor Seating
An essential element of your landscaping is certainly outdoor seating. After all, isn’t one of the reasons for all that work and investment hosting a dinner party, family gathering, or just good friends? Of course, there is a lot to consider when choosing a design for your outdoor entertaining: your goals, plans, and – of course – budget.
You may wish to center your outdoor entertainment area on one of these themes:
- Outdoor fireplaces – There are many options, from rustic, portable, permanent, to materials like copper, brick, stone, and more.
- Fire pits – In recent years, fire pits have become one of the more popular outdoor entertaining options. Although not quite as unlimited in scope as fireplace options, there are still plenty of different choices to suit your needs and budget.
- Grill areas – With outdoor grill areas, the choices are almost endless. Of course, you’ll want to think about how many guests you may be grilling for and how much seating you want in close proximity to the grill itself.
- Outdoor kitchens – If a grill or fire pit is too limiting for your plans, why not do an entire outdoor kitchen? Grills, smokers, pizza ovens, and cooktops can all be incorporated into your outdoor kitchen. And of course, here is where the seating really comes in to play. Everyone always hangs out in the kitchen indoors, so the same patterns will carry outside. Embrace it!
- Pool landscape design – A pool will often be a central point in outdoor landscaping, and you can incorporate seating as much or as little as desired. More seating in the pool area will of course encourage your guests to spend more time in that area.
- Water features – Fountains, ponds, and other water features add character and interest to any landscaping. And you must consider whether you want seating around them or whether they should more separated from your seating areas.
- Pavilion and pergola – A more dedicated seating design element is a pavilion or pergola. They provide shade, protection from the elements, and distinct space definition for outdoor entertaining. These will often be central to your seating design.

Light Up the Outdoors

There’s a lot to consider before investing in outdoor lighting. What do you want the focus of your lighting to be? Highlighting? Up-lighting? Path lighting? Or maybe it’s a combination of these and other factors. Perhaps there are certain design elements that you wish to feature, like a fountain or an outdoor structure. Or maybe you need to address pockets of darkness in your landscape.
You’ll want to consider these questions and many others. A few additional issues to take into account include:
- Views from indoors – What will your landscape look like from inside your home?
- Focal points – Are there particular trees, water features, or a gazebo that you would like to highlight?
- Sense of depth – Illuminating pathways, landscaped beds, and the house itself will lend a feeling of depth to the property.
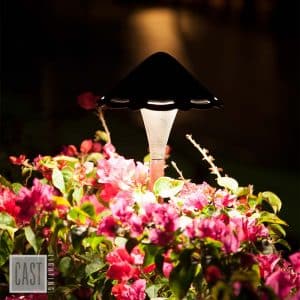

One of the leading providers of outdoor lighting fixtures is CAST®, and Knutsen Landscaping is proud to be CAST®-certified. Our installers will ensure that CAST® lighting fixtures will be best used to accent your property. The Classic, Impressionist, and Craftsmen series from CAST® offer a wide array of possibilities, and you can achieve the landscape illumination you desire.
Whatever your needs, Knutsen Landscaping is here to help. Our team of designers will assess your landscape and help you determine your goals for your lighting.
